Network-Servers-Penetration-Guides-and-Tools
Introduction to Linux 🐧
Requirements
- Ubuntu virtual machine (or any disto desktop general-purpose like Manjaro, Fedora etc) (1)
- Kali Linux virtual machine (2)
Objectives
- Understand the basics of Linux systems
- Perform basic system and network tasks from CLI (command line interface)
- Learn about Kali Linux and pre-installed security tools
Before jumpstart into Kali Linux tutorial, it is recommended to use a desktop general-purpose distro like Ubuntu or Manjaro for learning the basics and get used to, also you can check the DistroWatch to find a good distro to start with.
-
**The first part** of this tutorial uses Ubuntu VM to explain the basics of Linux environment, basic commands and techniques.
-
**The second part** is about Kali Linux itself, covering security tools using more advanced techniques.
⚠️ Warning: Kali is a Linux distribution specifically geared towards professional penetration testers and security specialists, and given its unique nature, it is NOT recommended to use as a general-purpose Linux desktop for development, web design, gaming, etc.
Why Linux so Popular?

-
Linux Torvalds not only created Linux but also made it available to the world for free. He then invited others to work for the modification of Linux and keep their contributions free. This is the reason why Linux gained an enormous amount of audience among hard-core developers very quickly. Another reason for this amazing amount of popularity is that Linux is extremely popular and favorite operating system among hackers. The main reason is Linux source code is freely available because it is an open source operating system.
-
Linux is appealing for the people who wanted to experiment with operating system principles and who needed a great deal of control over their operating system.
-
Linux is widely used to run the internet and in all 85% of all the servers are running Linux. Streams have 1600 games on Linux now, including many mainstream titles.
-
Linux is faster than windows and because Windows is a commercial operating system it costs a lot of money while Linux being an open source operating system is free.
-
The Linux terminal is superior to use over Window’s command line for developers. You would find many libraries developed natively for Linux. Also according to many developers, Linux helps the, get things done easily. Linux doesn’t encounter a large number of software updates, but you will also observe much faster software updates so that the problems you might be facing can be eliminated.
Setting up 🧰
First things first, you should download and deploy two virtual machines: Ubuntu Linux and Kali Linux.
The recommended configuration for Ubuntu VM is 2GB to 3GB RAM and at least 4GB of RAM to Kali. To makes things easier you can leave the default configuration for both machines.
Note: If you don’t know how to setup your VMs you can check the previous module on lab building or more specifically a tutorial on how to setup Ubuntu VM.
Diving into Ubuntu
At this point you should be familiar with a basic operating system such as Windows and the various programs that are already available on the Windows operating system. Ubuntu is no different, this linux distro is a very straightforward, stable and easy to use OS for newcomers, after the installation you’re ready to go and explore.

Note: This tutorial will teach you how to operate Linux by command line not the interface. Technically you can do some tasks by using the interface, but I encourange to do as much you can on CLI (command line interface) and this tutorial will guide through this. By this way you can have a granular control to handle the system.
- Fire up your Ubuntu VM and explore by yourself the interface, pre-installed applications and configurations.

UI vs. CLI
This example will compare the differences between UI(user interface) and CLI(command line interface) by performing a simple task:
- create a text file, write some words and save it.
This is just a simple example to grasp the idea behind command line.
- First, let’s create a text file using the interface. Click on the 6 dotted button on the bottom right (Show Applications) and open the Text Editor application

- Write hello world on the new file, and then save in your Desktop by giving the name hello.txt

-
Now, click again the 6 dotted button to show all applications and open a new Terminal window
-
To navigate to your desktop by using the terminal, type
cd Desktop. Next typeecho hello world > hello2.txt.cdcommand means change directory. The next command willechothe stringhello worldand the symbol>tells the system to output results into a new file, the target is usually a filename (hello2.txt).

- As you can see on the image below, the both methods perform the same results.

Bottom line, command line is the most powerful way to operate a Linux machine, you can leverage the granular control of Linux systems and do pretty much everything from command line in more robust, fast and efficient way. For example you can rename thousands of files with a simple one-liner command, instead of renaming one by one using UI. You can automate tasks, manage networks etc and do much more using the terminal.
Linux structure
In Windows, the root begins at the drive letter, usually C:\, which basically means it begins at the hard drive. In Linux however, the root of the filesystem doesn’t correspond with a physical device or location, it’s a logical location of simply “/”. See the graphics below for a visual representation.
To access the root of the filesystem, you can type cd to change directory following the destination / , representing the begining of the filesystem.
cd /
ubuntu@primary:/home$ cd /
Users  boot  etc   lib    lib64   lost+found  mnt  proc  run   snap  sys  usr
bin    dev   home  lib32  libx32  media       opt  root  sbin  srv   tmp  var
To understand the basics of each folder in the Linux file system is for, which will help us to better understand how Linux works in general. Note that not every folder listed here or pictured below necessarily appears in every Linux distro, but most of them do.

Core commands
The core commands will explore the most important user and system commands.
⚠️ Remember that every command have a manual page, you can access on this website or directly from terminal by typing:
man <command>
sudo
Sudo stands for SuperUser DO and is used to access restricted files and operations. By default, Linux restricts access to certain parts of the system preventing sensitive files from being compromised.
The sudo command temporarily elevates privileges allowing users to complete sensitive tasks without logging in as the root user.
- For example, lets try to update the Ubuntu packages without
sudocommand. To do that you can simple issue theapt-get updatecommand and hit enter.
purple@purple-vm:~$ apt-get update

Reading package lists... Done
E: Could not open lock file /var/lib/apt/lists/lock - open (13: Permission denied)
E: Unable to lock directory /var/lib/apt/lists/
W: Problem unlinking the file /var/cache/apt/pkgcache.bin - RemoveCaches (13: Permission denied)
W: Problem unlinking the file /var/cache/apt/srcpkgcache.bin - RemoveCaches (13: Permission denied)
As you can see above we got the “13: Permission denied” error, meaning that we need root privileges to update Ubuntu packages.
- Next, issue the command with elevated privileges (root) using
sudo. The command will be successfully executed.
purple@purple-vm:~$ sudo apt-get update
[sudo] password for purple:
Hit:1 http://pt.archive.ubuntu.com/ubuntu focal InRelease
Hit:2 http://pt.archive.ubuntu.com/ubuntu focal-updates InRelease
Hit:3 http://pt.archive.ubuntu.com/ubuntu focal-backports InRelease
Hit:4 https://brave-browser-apt-release.s3.brave.com stable InRelease
Hit:5 http://security.ubuntu.com/ubuntu focal-security InRelease
Reading package lists... Done
Also we have other apt-get variants:
apt-get upgrade-> simply upgrades/installs the new version of the package available over the old one.apt-get dist-upgrade-> This command looks for newer dependencies and prioritizes upgrading them by the possibility of removing the old ones – which could be dangerous. Make sure to read the official documentation before issue this command.
- You also can switch to root user by using
su. But is not recommended to operate as root as a security practice. Applications are meant to be run with non-administrative security, so you have to elevate their privileges to modify the underlying system.
purple@purple-vm:~$ sudo su
[sudo] password for purple:
root@purple-vm:/home/purple#
As you can see, the user purple jumped to root user by using su.
pwd
pwd stands for Print Working Directory. It prints the path of the current directory that you are in, starting from the root.
purple@purple-vm:~$ pwd
/home/purple/work/code
Linux Permissions
Linux has three permissions and they can be set for the owner, group or other.

r = read - open a file, view a file. w = write - edit a file, add or delete files for directories. x = execute - run a file, execute a program or script, CD to a different directory.
| Owner | Group | Other |
|---|---|---|
| rwx | rwx | rwx |
- Viewing the permissions on Linux command-line:
ls -l
-rwxrwxr-x 1 user user 31337 Feb 11 13:13 File
Using chmod
chmod is the command and system call which is used to change the access permissions of file system objects on Unix and Unix-like OS.
- Clear out the permissions of the File to have no read, write and execute permissions on Other:
(The flag equals to nothing[o=] deny the permissions)
ls -l
-rwxrwxr-x 1 user user 31337 Feb 11 13:13 File
chmod o= File
ls -l
-rwxrwx--- 1 user user 31337 Feb 11 13:13 File
- Giving read and write permissions to Group:
ls -l
-rwx---r-- 1 user user 31337 Feb 11 13:13 File
chmod g=rw File
ls -l
-rwxrw-r-- 1 user user 31337 Feb 11 13:13 File
- Giving all permissions to everybody(Owner,Group and Other):
ls -l
-rwx---r-- 1 user user 31337 Feb 11 13:13 File
chmod a=rwx File
ls -l
-rwxrwxrwx 1 user user 31337 Feb 11 13:13 File
Using chmod - oldschool way:
The chmod command will take the octal value and combine them to associate the permissions on three different positions for the Owner, Group and Other/Everyone. This boils down to a simple binary rule: 0 = off | 1 = on.
| Octal | Binary | Permissions |
|---|---|---|
| 0 | 000 | — |
| 1 | 001 | –x |
| 2 | 010 | -w- |
| 3 | 011 | -wx |
| 4 | 100 | r– |
| 5 | 101 | r-x |
| 6 | 110 | rw- |
| 7 | 111 | rwx |
If you want to give all permissions to a group for example, the number will be 7 (4 + 2 + 1).
| Read | Write | Execute |
|---|---|---|
| r– | -w- | –x |
| 4 | 2 | 1 |
Examples:
- Giving read, write and execute permission to everybody:
ls -l
-rwx---r-- 1 user user 31337 Feb 11 13:13 File
chmod 777 File
ls -l
-rwxrwxrwx 1 user user 31337 Feb 11 13:13 File
- Giving all permissions to the owner, read and write to group and no permissions to other/everyone:
ls -l
-r-x---r-- 1 user user 31337 Feb 11 13:13 File
chmod 760 File
ls -l
-rwxrw---- 1 user user 31337 Feb 11 13:13 File
Linux - File Ownership using chown (change file owner and group)
ls -l
-rwxrwxrwx 1 user001 user001 31337 Feb 11 13:13 File
sudo chown root File
ls -l
-rwxrwxrwx 1 root user001 31337 Feb 11 13:13 File
The chown command requires sudo
passwd
Changes the password of current user
sudo passwd
Network commands
ping
-
Can be handful for DNS checks (up / or down) is a DNS tool to resolves web addresses to an IP address. - Test reachability - determine round-trip time, and uses ICMP protocol.
~#: ping www.google.com

PING www.google.com (172.217.168.164): 56 data bytes
64 bytes from 172.217.168.164: icmp_seq=0 ttl=55 time=25.981 ms
64 bytes from 172.217.168.164: icmp_seq=1 ttl=55 time=25.236 ms
--- www.google.com ping statistics ---
2 packets transmitted, 2 packets received, 0.0% packet loss
round-trip min/avg/max/stddev = 25.236/25.608/25.981/0.373 ms
netstat
- Network statistics
-
Get info on host system TCP / UDP connections and status of all open and listening ports and routing table.
- Who you talking to?
- Who trying talking to you?
netstat -a # (show all active connections) (servers)
netstat -n # (hosts)
netstat -b # (Show binaries Windows)
traceroute
-
Traceroute - how packets get from host to another endpoint. Traceroute is helpful to see what routers are being hit, both internal and external.
-
Take advantage of ICMP Time to Live (TTL) Exceeded error message
- The time in TTL refers to hops, not seconds or minutes.
- TTL=1 is the first router.
- TTL=2 is the second router, and so on.

- As shown above, on HOP 2 the TTL exceeded and back to the device A, counting 3 on TTL for the next HOP.
~#: traceroute google.com

traceroute to google.com (172.217.17.14), 64 hops max, 52 byte packets
 1  192.168.1.1 (192.168.1.1)  4.960 ms  3.928 ms  3.724 ms
 2  10.10.124.254 (10.10.127.254)  11.175 ms  14.938 ms  15.257 ms
 3  10.133.200.17 (10.137.201.17)  13.212 ms  12.581 ms  12.742 ms
 4  10.255.44.86 (10.255.45.86)  16.369 ms  15.100 ms  17.488 ms
 5  71.14.201.214 (71.14.201.214)  13.287 ms  29.262 ms  16.591 ms
 6  79.125.235.68 (79.125.242.68)  22.488 ms
    79.125.235.84 (79.125.242.84)  13.833 ms *
 7  79.125.252.202 (79.125.252.202)  24.147 ms
    108.170.252.241 (108.170.25@.241)  26.352 ms
    79.125.252.202 (79.125.252.202)  23.598 ms
 8  108.170.252.247 (108.170.252.247)  31.187 ms
    79.125.252.199 (79.121.251.191)  22.885 ms
arp
- Address resolution protocol - caches of ip-to-ethernet
- Determine a MAC address based on IP addresses
- Option
-a: view local ARP table ```console ~#: arp -a
? (192.168.1.3) at 00:11:22:33:44:55 [ether] on enp0s10 ? (192.168.1.128) at e8:33:b0:70:2c:71 [ether] on enp0s10 ? (192.168.1.4) at 2c:33:5c:a4:2e:8a [ether] on enp0s10 _gateway (192.168.1.1) at 00:31:33:8b:2a:da [ether] on enp0s10
### `ifconfig`

* Equivalent to ipconfig for UNIX/Linux OS.

```console
~#: ifconfig
docker0: flags=4099<UP,BROADCAST,MULTICAST>  mtu 1500
        ether 00:11:22:33:44:55  txqueuelen 0  (Ethernet)
        RX packets 0  bytes 0 (0.0 B)
        RX errors 0  dropped 0  overruns 0  frame 0
        TX packets 0  bytes 0 (0.0 B)
        TX errors 0  dropped 0 overruns 0  carrier 0  collisions 0

enp0s10: flags=4163<UP,BROADCAST,RUNNING,MULTICAST>  mtu 1500
        inet 192.168.1.128  netmask 255.255.255.0  broadcast 192.168.1.255
        inet6 fe80::acf6:2ae2:ab5c:6316  prefixlen 64  scopeid 0x20<link>
        ether aa:bb:cc:dd:ee:ff  txqueuelen 1000  (Ethernet)
        RX packets 156651  bytes 29382856 (28.0 MiB)
        RX errors 0  dropped 0  overruns 0  frame 0
        TX packets 76400  bytes 23111524 (22.0 MiB)
        TX errors 0  dropped 0 overruns 0  carrier 0  collisions 0
iwconfig
similar to ifconfig, but is dedicated to the wireless network interface.
~#: iwconfig
lo        no wireless extensions.

enp0s10   no wireless extensions.

wlp3s0b1  IEEE 802.11  ESSID:off/any
          Mode:Managed  Access Point: Not-Associated   Tx-Power=19 dBm
          Retry short limit:7   RTS thr:off   Fragment thr:off
          Encryption key:off
          Power Management:off

docker0   no wireless extensions.
ip addr
show / manipulate routing, network devices, interfaces and tunnels.
Show all the ip configuration, mac address, ipv6 etc.
~#: ip addr
1: lo: <LOOPBACK,UP,LOWER_UP> mtu 65536 qdisc noqueue state UNKNOWN group default qlen 1000
    link/loopback 00:00:00:00:00:00 brd 00:00:00:00:00:00
    inet 127.0.0.1/8 scope host lo
       valid_lft forever preferred_lft forever
    inet6 ::1/128 scope host
       valid_lft forever preferred_lft forever
2: enp0s10: <BROADCAST,MULTICAST,UP,LOWER_UP> mtu 1500 qdisc fq_codel state UP group default qlen 1000
    link/ether aa:bb:cc:dd:ee:ff brd ff:ff:ff:ff:ff:ff
    inet 192.168.1.111/24 brd 192.168.1.255 scope global dynamic noprefixroute enp0s10
       valid_lft 4761sec preferred_lft 4761sec
    inet6 fe80::acf6:2ae2:ab5c:6316 scope link noprefixroute
       valid_lft forever preferred_lft forever
nslookup
- Query Internet name servers interactively; check if the DNS server is working
nslookup www.certifiedhacker.com

output:
Server:         192.168.1.1
Address:        192.168.1.1#53

Non-authoritative answer:
www.certifiedhacker.com canonical name = certifiedhacker.com.
Name:   certifiedhacker.com
Address: 162.241.216.11 inslookup www.certifiedhacker.com
Server:         192.168.1.1
Address:        192.168.1.1#53

Non-authoritative answer:
www.certifiedhacker.com canonical name = certifiedhacker.com.
Name:   certifiedhacker.com
Address: 162.241.216.11
dig
- DNS lookup tool - Functions like nslookup, but allows for further functionality.
dig www.certifiedhacker.com

output:
; <<>> DiG 9.11.14-3-Debian <<>> certifiedhacker.com
;; global options: +cmd
;; Got answer:
;; ->>HEADER<<- opcode: QUERY, status: NOERROR, id: 15708
;; flags: qr rd ra; QUERY: 1, ANSWER: 1, AUTHORITY: 0, ADDITIONAL: 1

;; OPT PSEUDOSECTION:
; EDNS: version: 0, flags:; udp: 2048
; COOKIE: 71bd915b07b3fd08757c9ad65e5d6f3e549d5187359e97cb (good)
;; QUESTION SECTION:
;certifiedhacker.com.           IN      A

;; ANSWER SECTION:
certifiedhacker.com.    14400   IN      A       162.241.216.11

;; Query time: 419 msec
;; SERVER: 192.168.1.1#53(192.168.1.1)
;; WHEN: Mon Mar 02 15:40:29 EST 2020
;; MSG SIZE  rcvd: 92
netcat
TCP/IP swiss army knife; you can make any type of connection and see the results from a command line. With nc you can connect to anything on any port number or you can make your system listen on a port number. Can be an agressive tool for recon.
- “Read” or “Write” to the network
- Open a port and send or receive some traffic
- Listen on a port number
- Transfer data
- Scan ports and send data to be a port
- Become a backdoor
- Run a shell from a remote device
stat
stat can return the status of an entire file system, the status of the first hard disk and so on.
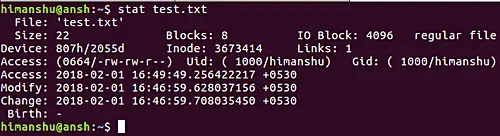
- Archive attribute - Windows - if something is created or changed
tcpdump
- Tcpdump is a data-network packet analyzer computer program that runs under a command line interface. It allows the user to display TCP/IP and other packets being transmitted or received over a network to which the computer is attached. Distributed under the BSD license, tcpdump is free software

Network Scanners
Useful for collect and inventory the hosts on a network, and is useful for reconnaissance of your system.
nmap
The Best way to query a system to check if they have open ports, services, system versions, service versions etc.
nmap -v -A -T5 scanme.nmap.org

...
PORT      STATE SERVICE    VERSION
22/tcp    open  ssh        OpenSSH 6.6.1p1 Ubuntu 2ubuntu2.13 (Ubuntu Linux; protocol 2.0)
| ssh-hostkey:
|   1024 ac:00:a0:1a:82:ff:cc:55:99:dc:67:2b:34:97:6b:75 (DSA)
|   2048 20:3d:2d:44:62:2a:b0:5a:9d:b5:b3:05:14:c2:a6:b2 (RSA)
|   256 96:02:bb:5e:57:54:1c:4e:45:2f:56:4c:4a:24:b2:57 (ECDSA)
|_  256 33:fa:91:0f:e0:e1:7b:1f:6d:05:a2:b0:f1:54:41:56 (ED25519)
80/tcp    open  http       Apache httpd 2.4.7 ((Ubuntu))
|_http-favicon: Unknown favicon MD5: 156515DA3C0F7DC6B2493BD5CE43F795
| http-methods:
|_  Supported Methods: GET HEAD POST OPTIONS
|_http-server-header: Apache/2.4.7 (Ubuntu)
|_http-title: Go ahead and ScanMe!
9929/tcp  open  nping-echo Nping echo
31337/tcp open  tcpwrapped
Service Info: OS: Linux; CPE: cpe:/o:linux:linux_kernel
...
[in progress]
to do notes
1) Ubuntu - basics - about Linux - how to operate - basic commands
2) Kali - advanced - about Kali - security tools - advanced commands
3) Bonus part - tmux, vim. - cool commands like terminal weather, neofetch —